Wednesday 7 August 2013

Queen Helene Mint Julep Masque/Mask - Review


I was not planning to post another mask review so soon after the last one but I had taken pictures a little while ago. I've been quite sick this past week and the weather has been quite hot which is not something I am able to handle all that well. I've been planning on posting every day for a while now, but somehow things keep stopping me from actually pulling through. Please bear with me though!

This has been my favourite mask ever, I think. I bought it about a year ago and have used it about 10 times, I'd say. There's still plenty left (I'd say you can use it for about 20 times, possibly more depening on how much you use). The Mint Julep Masque is incredibly cheap (depending on where you get it, though) and works really well. 


It promises to remove excess oil and refine pores (it doesn't! although it does clean them). The mask is a clay mask, which often are quite good at absorbing oil. I used to use it on my entire face but I must say that stung a bit too much on my cheeks, who are not oily anyway. I love using this on my t-zone. It really does clean pores well and it makes my t-zone pretty matte. I love the ingredients, except for the added fragrance and the price of course is pretty great!


Here's what my face looks like after the mask had been on for a few minutes. I hate how I forgot a bit on my nose, though!


And here's a little zoomed in version. This mask is pretty great for anyone with oily skin/an oily t-zone.

Thursday 1 August 2013

The perfect Enchiladas


I just had these last night and I was not planning on making this a recipe, since I had never made them before. I have to rave about these though! It takes a bit of time, but these enchiladas are much tastier than the boring wraps I've been making for months.

I do not have pictures of every step of the way, but it's pretty simple. I made these dish for 4 people which means 2 enchiladas each. I served them with some lettuce, sour cream and some guacemole I made myself. We were all pretty full by the time we were done so you should be good with 2 each.

Let's get started. Grab a pot and fill it with water. Make it boil and then add the chicken. How long it needs to boil depends on your chicken. Are you using big chicken fillets? Make them boil for about 10 minutes. I used some diced chicken, which I cooked for 10 minutes but it was not necessary. 8 would have been ok too. Keep stirring every now and then.

In the meantime, grab a pan and fill it with olive oil. Add some capsicum and stir it around for about 2 minutes. Then add your onion and garlic (everything diced of course!) When that's all done add your can of diced tomatoes. I felt it wasn't enough and I blended up two big tomatoes as well and it added it to the sauce. 

By the time I had done all that, my chicken was done. I put the chicken on a plate to cool off for about five minutes. Back to the sauce! I stirred that around for a couple of minutes and then added the kidney beans and corn. Make sure you don't add the liquid from those cans. I never really like that! So drain well.

Stir it around for a couple of minutes on low heat. I wanted to pick apart my chicken with a fork but it did not really work out. Lazy as I am, I grabbed my blender and just blended up the chicken. Yep, sounds weird but worked surprisingly well. Then I put it back on the plate.

Then it was time to preheat my oven to 180 degrees Celsius. Then I grabbed an oven dish and my tortillas. The sauce was done so I grabbed a tortilla, dipped it in my sauce and made sure some of the sauce went on each side of the tortilla. This took me about 20 seconds each. All of the veggies in the sauce fell off, but that was fine. Then I put the tortilla on the plat, put some sauce on it (with the veggies!) and then also put some chicken on it. Then I folded the tortilla and put it in the oven dish. Repeat until all the tortilla are sitting in the dish, nice and snug.

If all is well, you will have some of the sauce left and you can drizzle that on the tortillas in the oven dish. Then top with some fresh coriander/cilantro. Finally, grab some cheese to top it off with. Then put it in the oven for about 15-20 minutes. Mine went in for about 18.

I hope you'll enjoy this as much as I did. It's pretty straightforward, but you'll still be in the kitchen for a little bit.


Ingredient list (serves 4)

- 8 tortilla wraps
- 2 chicken fillets or about 300 grams of diced chicken
- 1 red capsicum/bell pepper
- 1 onion
- 1 garlic clove
- 2 big tomatoes
- 1 can of diced tomatoes
- 1 can of corn
- 1 can of kidney beans
- 2 tablespoons of chilli powder or other herbs you like
- some fresh cilantro/coriander
- cheese

Wednesday 31 July 2013

Burt's Bees Super Shiny Mango Shampoo and Conditioner - Review


As a big mango fan, recently I decided to search some of my favourite beauty webshops for mango products. I'm not that into hair care, but I really fell for these two. This shampoo and conditioner are filled with mango seed oil. The shampoo also has fig oil and the conditioner some avocado oil. Both promise to defrizz and moisture your hair to make it look all shiny. A plus is that no harmful ingredients are used in these as opposed to most drugstore shampoos and conditioners.


So, what do I think of these? They both do not smell much like mango and don't expect your hair to suddenly look amazing. Both of these products do the trick for me. They make my hair clean and smell somewhat fruity (the mango scent is not that apparent). The conditioner makes my hair soft and it's easy to brush afterwards. If you're looking for natural hair care products I would recommend these. Are they any good for mango lovers, though? Hm... not really I'd say.


Shampoo (on the left) and the conditioner (on the right).

I bought these at feelunique for GBP 8.50 each.

Tuesday 30 July 2013

New York Cheesecake recipe


This is one of my favorite recipes ever. This cheesecake is quite easy to make and it's super delicious. I've made it about 3 times now, using different measurements each time. This time, I feel I've gotten it down to pretty much perfection, so I wanted to share the recipe with you guys.


First of all I need to mention that I bought a new springform pan especially for this cake. I have a regular sized one at home (⌀ 24 cm) and I knew that if I made the cheesecake in that, I would just eat the entire cake myself. I used a smaller one (⌀ 20 cm), which will cut you about 8 normal sized slices instead of 10-12 slices.

First we're going to make the crust of the cheesecake. Melt your butter in the microwave and get your cookies ready. Make sure you blend this all together. Then preheat your oven at 160 degrees Celsius. Cover the bottom of your springform pan and then put it in the oven for about 10 minutes.


This gives us some time to get the filling ready. I have to say that I have tried several combinations and measurements of ingredients and it does not come down to a couple of grams more or less. Start off with throwing all the creamy ingredients into a bowl and mix it all up a little for about 30 seconds. Then add all the other ingredients: sugar, flour, vanilla essence, cinnamon, lemon juice and the egg(s).


This is what it should kind of look like... although this is not a very exciting picture. Moving on!


The crust and the filling are ready now. Just pour it all in... and voilà!


Pop this in the oven for about 50 minutes and it should look something like this:


Mine is slightly on the darker side so I would definitely suggest you check up on your cake after 30 minutes have passed. My cheesecake was still very delicious so it's not a major disaster if it's a bit dark. When it gets out of the oven make sure it cools down inside the oven for a while and then pop it out and leave it to cool down for about an hour and then put it in the fridge for about 4 hours. Then it should be done! Trust me though, it's very difficult to wait.


I topped my cheesecake with some raspberries. Yum, delicious!

Ingredient list

For a springform pan of ⌀ 18-20 cm (relatively small, which is what I used):

- 8 digestive cookies (use 6 for a thin crust, 8-10 for a thicker crust)
- 60 grams of butter
- 2 tubs of cream cheese, 185 grams each (I used philadelphia)
- 1 tub of ricotta (250 grams)
- 1 tub of crème fraîche (125 grams)
- 30 grams of flour
- 1 teaspoon of cinnamon
- 2 teaspoons of vanilla essence
- 2 tablespoons of lemon juice
- 1 large egg

For a springform pan of ⌀ 22-24 cm (regular size):

- 12 digestive cookies
- 100 grams of butter
- 3 tubs of cream cheese, 185 grams each (I used philadelphia)
- 2 tubs of ricotta (250 grams each)
- 1 tub of crème fraîche (125 grams)
- 50 grams of flour
- 2 teaspoons of cinnamon
- 2 teaspoons of vanilla essence
- 3 tablespoons of lemon juice
- 2 large eggs

Tuesday 23 July 2013

Uncover Skincare & Suncare/Suncover by Jetske Ultee review


This article will be mainly in Dutch since the products are only available in the Netherlands. I really like these sunscreens as they do not irritate the skin and have calming ingredients for the skin. For more information you can contact me at closetandpantry (@) gmail dot com.

Dit artikel plaats ik in het Nederlands aangezien deze producten momenteel alleen in Nederland verkrijgbaar zijn. Ik ben een grote fan van de blog van Jetske Ultee, waar zij als dermatoloog tips geeft met betrekking tot huidverzorging. Daarnaast heeft zij op basis van haar ervaringen en kennis als dermatoloog een eigen skincare lijn samengesteld. Aangezien ik zonnebrand er belangrijk vind, heb ik ongeveer een maand geleden twee zonnebrandproducten gekocht uit haar lijn. 

Links op de bovenste foto zie je een zonnebrand met een SPF30 uit de Suncover lijn. Dit product is non-profit en alle opbrengsten gaan naar de stichting Sunwiser die kinderen op een educatieve manier wil leren om zich te beschermen tegen de zon. De zonnebrand is zowel geschikt voor het gebruik op het gezicht als op het lichaam. Deze flacon bevat 250 ml en kost € 12,50. Deze zonnebrand is tevens verkrijgbaar in een flacon met 1000 ml voor € 39,95.

Rechts op de foto staat een zonnebrand van SPF30 speciaal voor het gezicht. De flacon bevat 50 ml en kost € 39,95. Dit product is niet non-profit, maar bevat wel andere en kostbaardere ingrediënten dan de non-profit zonnebrand.


De linker flacon van 250 ml bevat een klikdop. Deze dop werkt voor mij erg prettig en daarnaast is het ook hygiënisch. 


De zonnebrand speciaal voor het gezicht bevat een pompflacon. Deze is ook zeer hygiënisch, maar het verschil is dat deze zonnebrand iets gemakkelijker te doseren is. Dit is natuurlijk ook belangrijker voor een zonnebrand voor het gezicht.


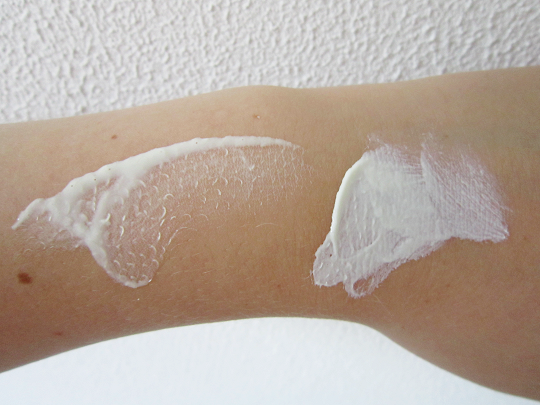
Aan de linkerkant zie je de zonnebrand voor het lichaam en gezicht en aan de rechterkant die speciaal voor het gezicht. Het verschil is goed te zien. De zonnebrand die ook voor het lichaam te gebruiken is, is vloeibaarder aangezien het zo makkelijker te smeren is. De andere zonnebrand is wat dikker en voedt meer.

Ingrediënten zonnebrand voor lichaam en gezicht:

Aqua, C12-15 Alkyl Benzoate, Dibutyl Adipate, Diisopropyl Sebacate, Diethylamino Hydroxybenzoyl Hexyl Benzoate, Methylpropanediol, Ethylhexyl Triazone, Cetearyl Alcohol, Bis-Ethylhexyloxyphenol Methoxyphenyl Triazine, Phenylbenzimidazole Sulfonic Acid, Niacinamide, Glycerin, Vanillin, Caprylyl Glycol, Polyglyceryl-2 Dipolyhydroxystearate, Lauryl Glucoside, Pentaerythrityl Distearate, Sodium Cetearyl Sulfate, Xanthan Gum, Triacetin, Phenylpropanol, Tetrasodium Glutamate Diacetate, Citric Acid, Sodium Hydroxide.

Ingrediënten zonnebrand voor gezicht:

Zonnefilters: Tinosorb M (methylene bis-benzotriazolyl tetramethylbutylphenol) en Tinosorb S (bis-ethylhexyloxyphenol methoxyphenyl triazine). 

INCI lijst: Aqua, C12-15 Alkyl Benzoate, Bis-Ethylhexyloxyphenol Methoxyphenyl Triazine, Methylene Bis-Benzotriazolyl Tetramethylbutylphenol, Methylpropanediol, Dipropylene Glycol Dibenzoate, Niacinamide, Cyclopentasiloxane, Potassium Cetyl Phosphate, Polymethyl Methacrylate, Cetyl Alcohol, Cyclohexasiloxane, Caffeine, Hydrogenated Dimer Dilinoleyl/Dimethylcarbonate Copolymer, Lecithin, Tocopheryl Acetate, Decyl Glucoside, Camellia Sinensis Leaf Extract, Tocopherol, Helianthus Annuus Seed Oil, Glycerin, PPG-15 Stearyl Ether Benzoate, Caprylyl Glycol, Decyl Glucoside, Acrylates/C10-30 Alkyl Acrylate Crosspolymer, Phenylpropanol, Tetrasodium Glutamate Diacetate, Propylene Glycol, Xanthan Gum.

Deze lijsten zien er elk iets anders uit. Maar wat zijn dan de verschillen? Beide soorten bevatten anti-oxidanten die de huid beschermen tegen schade en de zonnefilters. Wel is het zo dat deze ingrediënten over het algemeen vrij duur zijn, en voor een lichaamsproduct is het haast onmogelijk om een grote hoeveelheid anti-oxidanten toe te voegen. De prijs zou dan erg hoog worden. Beide producten bevatten het ingrediënt Niacinamide, een relatief betaalbaar ingrediënt dat de huid beschermt tegen de zon. De zonnebrand voor het gezicht bevat echter ook cafeïne en vitamine E. Deze ingrediënten kalmeren en herstellen de huid.

Een ander verschil is dat deze producten andere zonnefilters bevatten. De zonnebrand voor het gezicht bevat zonnefilters die vrij duur zijn en de veiligste filters zijn die er bestaan. De zonnefilters zitten tussen fysische en chemische zonnefilters in, maar worden niet door het lichaam opgenomen in de bloedbaan. Deze filters zouden te vet zijn voor het gehele lichaam en te plakkerig. Daarnaast zijn ze ook te duur om te gebruiken in een product voor het lichaam. Aangezien de meeste mensen het meest bezorgd zijn om hun gezichtshuid en dit een relatief klein oppervlak is, zijn deze zonnefilters een goede keuze. De zonnebrand voor het lichaam bevat goedkopere maar desondanks ook veilige zonnefilters en iets minder anti-oxidanten. Deze is echter wel iets betaalbaarder.

Op de flacons staat ook een advies hoe je de zonnebrand het beste kan gebruiken. Op de grote flacon staat dat je jezelf elke 2 uur opnieuw moet insmeren, een flinke laag moet gebruiken en na het zwemmen weer moet insmeren. Op de kleine flacon, de zonnebrand voor het gezicht, staat dat je 's ochtends een halve theelepel moet gebruiken en vervolgens op zonnige dagen opnieuw moet insmeren. Hoe vaak weet ik echter niet. Wellicht hoef je je met deze zonnebrand minder in te smeren aangezien de zonnefilters erg stabiel zijn. Wellicht ook niet! Om zeker te zijn, moet je jezelf denk ik toch om de twee uur insmeren. Als je make up draagt over je zonnebescherming is dit echter lastig. Zelf gebruik ik hiervoor een poederspf (maar hier zal ik later nog eens over bloggen).


Natuurlijk ook niet onbelangrijk: hoe voelen deze producten aan op de huid? Beide soorten zonnebrand zijn niet vet en smeren makkelijk uit. De zonnebrand voor het lichaam is vloeibaarder en smeert nog iets makkelijker uit. De zonnefilter in het product speciaal voor het gezicht kan soms een vettiger aanvoelen, maar mijn ervaring is juist het tegenovergestelde. Voor de vette huid zou ik deze in ieder geval voor het gezicht eerder aanraden. De zonnebrand is inderdaad voedender, maar droogt sneller en matter op. Het zit mooier onder make up. Daarnaast zijn de ingrediënten ook wat beter voor de gezichtshuid.

Voor het lichaam is de zonnebrand (links) gewoon een prima optie. Het hydrateert de huid en beschermt de huid goed. Overigens zijn beide soorten niet vet en ook zeker goed te gebruiken voor het gezicht.

Ik moet wel opmerken dat de producten allebei niet heel erg lekker ruiken. Ik vind het moeilijk te omschrijven maar het ruikt een beetje naar boter. Voor zulke goede producten neem ik dit echter op de koop toe.

Overzicht:


Suncover SPF 30 gezicht + lichaam
Suncover SPF 30 gezicht
Flacon
Drukdop
Pompflacon
Substantie
Vloeibaar, makkelijk uit te smeren
Vrij voedend, droogt mat op
Zonnebescherming
Veilige zonnefilter
Veilige zonnefilter (Tinosorb)
Verzorging
Niacinamide
Niacinamide, cafeïne, vitamine E
Geur
Zelfde
Zelfde
Prijs
€ 12,50 per 250 ml
€ 39,95 per 50 ml

Monday 22 July 2013

Lush Catastrophe Cosmetic Fresh Mask review


Hi everyone! I'm a big fan of using a mask a few times a week, I really feel like it helps you and your skin relax a little bit. I can't say that I'm totally convinced that most masks do a great job of 'giving your skin that little extra boost', but the overall experience of putting it on and feeling a (hopefully!) softer skin once you rinse it off.

Today I will review a Lush masks that's full of blueberries. I really love fruity masks. I've tried the Lush Cupcake mask before, and I did not completely love it. Even though it was full of chocolate I did not adore the smell too much so when I went to Lush again about a month ago, I specifically asked for a really nice smelling mask since I do not believe masks can treat all of your skin problems anyway.


So what does this mask promise? The Lush Catastrophe Cosmetic Mask is meant to be used after you've done some terrible things to your skins such as not cleansing it well. The mask is full of antioxidants and blueberries of course. When you buy it it stays nice and cool in the fridge for about 3-4 weeks, the expiry date can be found on the back. Lush says that you can use it for about 3 masks, but my experience is that you can often use it about 4-5 times if you do not put too much on.

I used this mask 3 times since it came to close to the expiry date. I think I could have at least used it 4 times, though. I really loved the smell and it really left my skin soft and somewhat glowy afterwards. Do not expect miracles though, of course. I also always doubt whether the ingredients in the Lush masks really stay effective after the oxygen gets to it. Oh well, still a nice mask though that I would recommend!

Thursday 18 July 2013

Goat's cheese portobello with creamy pasta


I assure you, this might look difficult to make but it's absolutely not. It's not very low-fat but oh so delicious. It's also a dish you can really adjust to your own tastes. Leave some ingredients out if you want, or add some! This dish combines all of my fasvourite ingredients together: tomatoes, onions, mushrooms and goat's cheese. It's easy to make but looks fancy enough to serve to guests as well.


I made this recipe for four people, and they all seemed to really enjoy it. The key ingredient here is the portobello mushroom. Most supermarkets in my country did not seem to sell these. When I finally stumbled upon them after searching for them for months I was in mushroom heaven. They're very delicious and nice to fill up and throw in the oven.

That is also what you need to start with here. Grab your portobello mushroom(s) and make sure all dirt is removed. Do not and I repeat DO NOT rinse these mushrooms with water. They will soak up the water and that's not what we want. Put the mushrooms on a tray. Make sure you boil some water for your pasta and preheat the oven (about 200 C/400 F).

Now we're going to make the mushroom filling. Grab whatever goat's cheese you prefer, I added goat's cheese with honey. Mash it in the bowl a little bit. This could also go well with other soft cheeses such as roquefort or some other nice blue cheese. Then, chop up a small onion (I used a Spanish onion) and throw it into the mix as well. Add a diced tomato and dice up some sundried tomatoes. Add some pine nuts and a chopped up garlic clove. Next, add some olive oil and some parsley. Many people dislike parsley and I'm sure basil could have worked too. Remember to just adjust the recipe to your preferences. Finally, you should add some peper and a few tablespoons of cream to make the mixture a bit more moist and to bind the ingredients together. Not to mention, cream is simply delicious.

Back to the mushrooms. Brush a little bit of olive oil on them and then put the mixture in them with a spoon. Then grill the mushrooms in a preheated oven. They should be ready in about 10-15 minutes depending on the oven. Make sure to check up on them often.

Now it's time to boil some of your favourite pasta. I chose seashells here because I think they look a little bit more exciting than just penne of spaghetti. Make sure to add some salt to the water too.

Now, in a different pan cook up some cream and add a little bit of the leftover goat's cheese. I also added some extra diced tomatoes and some salt and pepper. This mixture should be ready within 4 minutes. When the pasta is ready, stir it through the sauce. You don't need much sauce as the mushrooms have a lot of flavour already.

When your mushrooms are ready, take them out of the oven. Now grab your plates and serve the pasta on each plate with a mushroom on top. I added some extra chives, but that is completely optional. I hope you'll enjoy this as much as I did!


Ingredient list (serves 4):

- 4 portobello mushrooms
- 200 gram goat's cheese for mushroom filling + 100 gram for the sauce
- about 250 ml of cream (about 70 for the mushroom filling, the rest for the sauce)
- 2 handuls of pine nuts
- 2 large tomatoes
- about 4 sundried tomatoes
- small onion
- 1 garlic clove
- some parsley
- olive oil
- salt
- pepper
- seashell pasta